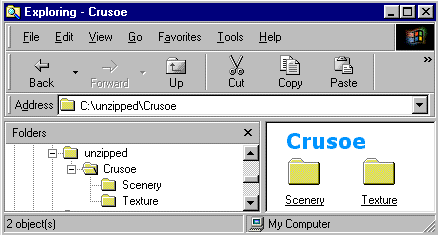
FS2004 Scenery Clinic


Installing 3rd party scenery to FS2004 (FS9) is not difficult.
Providing it's installed & activated correctly you should have no problems.
If it conflicts with existing scenery the offending area can be easily deactivated or removed.

The basic principle for installing & activating imported scenery is the same for all MS sims.
FS2004 uses the FS2000-style Scenery Library also featured in CFS2 & FS2002.
It can be accessed from Settings/Scenery Library on the FS2004 (FS9) start-up screen.

First - make sure the files are configured correctly. Most scenery comes ready-configured for install but there is always the exception.
The new area should be in a suitably named parent folder with Scenery & Texture subfolders.
BGL files in Scenery & texture files in Texture
.


INSTALLING SCENERY

The easiest method for installing all types of imported scenery to FS2004 is to paste the parent folder (containing Scenery & Texture subfolders) into the Flight Simulator 9\Addon Scenery folder.
This would be the Crusoe folder in the above example.

Providing it's configured as shown above, 3rd party scenery can be activated from any location & any drive on your PC.
You can use the remote Scenery Directory described in my original FS98 Scenery Clinic if preferred.
The important thing is that you know where it's located.


ACTIVATING SCENERY

To activate the scenery, run the sim & click SETTINGS/Scenery Library. Click the Add area button.
Browse to the Addon Scenery folder & select the parent folder of the scenery you just installed.
Click OK. The scenery is now installed & activated.

After doing this in FS9 you will see this warning.

Simply click OK, exit the sim & restart it for the new scenery to display.


NOTE:

If new airports are not listed on the usual Airport menu try the Search Add-on Scenery option.


TROUBLESHOOTING
If there's a conflict or some other problem imported scenery can easily be deactivated or deleted from the Scenery Library.

  • To deactivate an area, uncheck the box next to it on the list.
  • To permanently remove an area, select it from the list & click Delete area.
    (You should do this before moving or deleting the folder from your scenery directory.)

AFCAD

Scenery for airports will often include AFCAD updates. These might also be posted separately.
Unlike conventional scenery, AFCAD BGL files must be installed to the correct location in FS2004.
Please follow the author's installation instructions in the Readme file with the download.

FS9 version of AFCAD here if you need it. AFCAD 2.21

Home

If you have problems please Mail me

© Grumpy's Lair 2004