CFS2 Scenery Clinic


Not sure how to install scenery to CFS2?
I get a lot of questions on scenery installation so thought it was about time for this CFS2 Scenery Clinic.

After a great deal of experimenting I have come up with what I think is the easiest method of scenery installation. Some of the ideas are not mine, I just use them. Why not print this out and give it a try?
Always read the designer's installation instructions first as there may be other considerations.

TIP: Try using the right-click mouse options in Windows Explorer or My Computer.

NOTE: The scenery used in this example is purely imaginary. Your scenery will obviously have a different name. Use the original folder name if possible or choose a folder name that is short and easy to remember, e.g. Guad for Guadalcanal.


WHICH SCENERY IS SUITABLE FOR CFS2?

  1. New areas, airfields or static scenery designed specifically for CFS2.
  2. Scenery designed for FS2000 works well in CFS providing you observe a couple of rules.

Be careful not to install large regional areas which overlap the area covered by the default CFS World.
Updated FS2000 default airports will not display correctly in CFS2 or show up on the Free Flight menu.

Some 3rd party style scenery requires the Airport & VOD Textures.
These are posted in the Essentials/Utilities section at Simviation.
Unzip them to a Temp folder first. Then paste all the files into the CFS2 texture folder.
You only need to do this once.


SCENERY DIRECTORY

Where should I install my CFS2 scenery? Opinions vary on this.
Unlike other imported files, scenery does not need to be installed to a specific folder in CFS2.
It can be activated from any location on your HD but the CFS2\Addon folder is a convenient location to keep all imported scenery.

Note: Those already using the remote scenery directory described in my CFS Scenery Clinic can still use it for CFS2 scenery if preferred. I find it more convenient to keep all my 3rd party scenery for 4 different MS sims in the same remote scenery directory.


SORTING SCENERY FILES
This section is copied from my original CFS Scenery Clinic

The designers all have their own methods for scenery installation & file configuration.
With some you will get a folder full of mixed files, while others come ready configured for installation.
For the purposes of this tutorial I will use some imaginary scenery named Crusoe Island, somewhere in the Pacific Ocean. It's of the mixed files variety. Let's sort those files into folders, ready for installation.

Open the unzipped Crusoe Island folder in Windows Explorer or My Computer.
Create a New Folder inside the Crusoe Island folder with all the other files, renaming it Scenery.
Click View on the Menu Bar and select Arrange Icons/by Type from the Drop Down Menu. This will sort the files making them easier to find.
Highlight all the files ending with .bgl and drag them into the new Scenery folder.
Make sure you get them all.

Now create another New Folder, this time renaming it Texture.
Drag all the remaining files, except any ending with .STN, into the Texture folder.
Some files do not need to be in the folder but it won't matter.

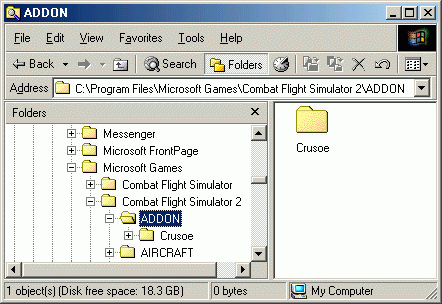
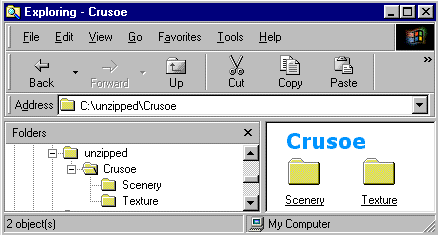
Finally, create a third New Folder, renaming it Crusoe.
Drag the Scenery and Texture folders into it.

You now have a Crusoe folder containing two sub-folders named Scenery and Texture.
This is how a correctly configured scenery folder should look.


INSTALLING SCENERY

To install the Crusoe Island scenery, simply paste the Crusoe folder into your Addon scenery directory.


ACTIVATING SCENERY

Before you can use it, the Crusoe Island scenery will need activating from the CFS2 Scenery Library.
The FS2000 style Scenery Library makes it so easy compared with CFS1.

  • Fire up CFS2 and select Settings.
  • Click the Scenery library button
  • Click Add area
  • Open the Addon scenery directory folder
  • Click the new Crusoe folder to select it. The Directory path & Scenery area title will show in the appropriate boxes.
  • Change the Scenery area title if you wish. If no name appears & you're positive the scenery is installed correctly, type a suitable name in the box. This is simply how the new Scenery Area will be listed in the Scenery Library.
  • Click OK to return to the Scenery Library screen.

Unless you chose the Minimal CFS2 install option I suggest you use the Cache settings shown above.
The "Scenery object density" slider can be adjusted to suit your system.
Some scenery might not display correctly at low density settings.

Click OK to return to CFS2.
That's it! You have installed and activated the Crusoe Island scenery.


PRIORITY

In most cases each new area can be left at the top of the Priority list.
It's important to understand how the Priority can affect how some imported scenery displays.
Scenery is arranged in layers depending how its listed in the Scenery Library. Higher priority areas (those listed nearer the top) can read textures from activated areas below but not above them on the list.
To avoid including duplicate files in each separate area, prolific scenery designers sometimes use a master scenery area containing common textures. These master areas must be installed & activated and should be arranged below their later releases to display properly.

For example, GZR_Frenchy's GZR_Base2002 must be installed, activated & arranged in a layer below most of his other excellent CFS2/FS2002 airfields including GZR_Guernsey Water Base & GZR_Norderney WB.
This is fully explained in the Readme instructions with his files.


SELECTING SCENERY

Some add-on scenery won't show up on the Airfield list in Free Flight or Quick Combat.
To use it from Free Flight or Quick Combat you will need to click Start Location.
Then click Advanced Go To & select the Scenery from FS95 and before button.

The new scenery area should be on the Scenery areas list.
Click on it. There may be one or more airfield or runways listed under Search results.
Select one, click OK and you should go there.
Click World/Time and Weather on the CFS2 menu bar to change the time.

FLATTEN & EXCLUDE SWITCHES

Most CFS2 scenery includes BGL files which will automatically flatten or exlude default areas to avoid conflicts.
For some FS2000 scenery the Flatten/Exclude switches will require adding manually to Scenery.cfg.
This is not difficult. Look for references to Flatten or Exclude switches in the designer's instructions.
Here's an example of an Exclude switch. The Flatten switch is very similar.

Exclude=N51 30.5,W3 27.5,N51 15.5,W3 12.5,objects

First install & activate the scenery. Then exit CFS2 & open the CFS2 main folder. Find Scenery.cfg & open it in Notepad. The switch can be added anywhere in the CFG but the best place for it is directly below the appropriate [Area.0xx] entry, usually right at the bottom of the text.
The easiest method is to Copy/Paste the complete line from the designer's Readme into Scenery.cfg.


AUTHOR'S COMMENTS

This method of scenery installation has been extensively tested for me by beginners all over the World.
It appears to work well with all types of scenery. Although the Scenery Library varies it's suitable for all current MS sims. I've used it myself with no problems at all in FS98 thru FS2002 over the last 3 years.
I would be interested in any feedback and suggestions for additions to the article. Good Luck!

© Grumpy's Lair 2002